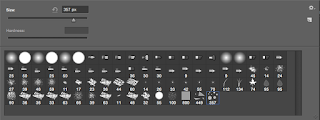
Photoshop has a variety of preset brushes to use for projects. But what if the brush you want isn't available? Do you combine brushes together, add objects one at a time, or anything else time consuming?
No need to fear any longer! This quick tutorial will show you how to make a custom brush of your own design in a few steps!
STEP 1
 |
| Original Hexagons |
 |
| Scaled Down Hexagons |
The first main step would be to make a new project, then make the shapes for your brush, preferably from the polygon tool. I chose to make hexagons because of it being a simple shape not many people would use. Make sure that there is some variety to your brush by repositioning, rotating, and scaling down your shapes. Once that is done, scale down your shapes to fit the canvas.
STEP 2
The next step would be to select your object(s) for your brush, and go to Edit >Define Brush Settings, or search for it on the Help menu. From there, this pop up will appear. Rename your brush to something relevant- I named mine "Hexagons".
STEP 3

After you have made your brush, it should appear with all of your other brushes. It will then show a number, which represents the brush size made by default. This "default size" comes from how big the pixels were when you first made the brush.
STEP 4
 |
| Original Brush Settings |
 |
| Shape Dynamics Settings |
 |
| Scattering Settings |
 |
| Transfer Settings |
Select your custom brush and go to the Brush tab on the right tab. From there, you can mess with the different effects like Shape Dynamics and Scattering. Here are some screenshots of each effect I placed. I recommend that your brush has the Opacity Jitter, Flow Jitter, and Size Jitter so your brush's shapes are different and look unique. Feel free to change these settings to your own liking.
STEP 5
 |
| Hexagons Shift Position with Cursor Movement |
Now that your brush's settings are adjusted, it's time to test them out! I used my brush and found something very interesting. Every time I press my brush down, then move my cursor out, the brush shape will rotate and move at a slanted angle. This is shown above, which I like because it gives the picture perspective.
 |
| Hexagons With One Brush Size |
 |
| Hexagons With Multiple Brush Sizes |
Go on and play with your brush settings. Do crazy things like mess with the brush size, opacity, and colors! Above are two example I made with my hexagon brush. The top image contains hexagons made with one single brush size, while the one below contains hexagons with several different brush sizes. I showed it this way so users can compare how different brush sizes affect a project.
That concludes this tutorial! I will possibly include more tutorials and other posts for upcoming projects of mine.


No comments:
Post a Comment